
CheerUp_Cheers
스프링 부트 - (2) 스프링 부투에서 테스트 코드를 작성하자. 본문
스프링 부트 - (2) 스프링 부투에서 테스트 코드를 작성하자.
meorimori 2020. 3. 11. 18:022. 서론
- 최근 추세, 대부분의 서비스 회사가 테스트 코드에 관해 요구(최소한의 테스트)
- 테스트 코드 작성의 기본을 배우자.
2.1 테스트 코드 소개
(1)TDD : 테스트가 주도하는 개발.
(2)단위 테스트 : TDD의 첫 번쨰 단계인, 기능단위의 테스트코드를 작성하는 것
따라서, TDD와 단위테스트는 다름.
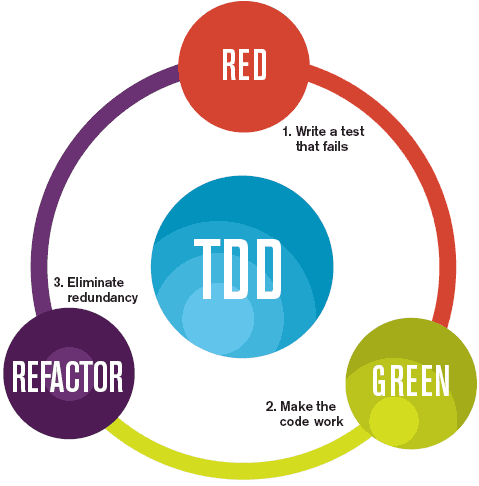
- RED : 항상 실패 하는 테스트 먼저 작성.
- Green : 테스트가 통과하는 프로덕션 코드작성
- Purple : 테스트가 통과하는 프로덕션 코드 리펙토링.
#왜 단위 테스트가 중요할까요?
- 단위테스트 자체가 문서로 사용가능.
- 개발 단계 초기에 문제 발견.
- 코드를 리팩토링 하거나 라이브러리 업그레이드 등에, 기존 기능이 올바르게 기능하는지 확인
ex) 회귀 테스트.
- 코드 수정 시, 사람 눈으로 검증하지 않게 자동 검증.
ex) 톰캣을 껐따가 켰다가 눈으로 확인했다가 내렸다가..
#개발환경
JUnit - 자바용.
2.2 Hello Controller 테스트 코드 작성하기
(1) Application 클래스
메인 클래스.
package com.jojoldu.book.springboot;


import org.springframework.boot.SpringApplication;
import org.springframework.boot.autoconfigure.SpringBootApplication;

//메인클래스가 될것.

@SpringBootApplication
public class Application {
    public static void main(String args[]){
        SpringApplication.run(Application.class, args);
    }
}
- @SpringBootApplication
자동설정, Bean일기와 생성을 모두 자동
->@SpringBottApplication부터 읽어 가기 때문에, 항상 프로젝트 최상단 위치.
- run
내장 WAS를 실행.
-> 내부에 별도로 외부에 WAS를 두지 않음(= 항상 서버에 톰캣을 설치할 필요가 없음.)
-> 언제어디서나 같은 환경에서 프릉부트 배포.
(2) Controller
package web;


import org.springframework.web.bind.annotation.GetMapping;
import org.springframework.web.bind.annotation.RestController;

@RestController
public class HelloController {

    @GetMapping("/hello")
    public String hello(){
        return "hello";
    }
}
- @RestController
컨트롤러를 JSON을 반환하는 컨트롤러로 만들어 줌.
예전에는 각 메소드마다 선언했떤 것을 한번에 사용 가능.
- @GetMapping
Http Method인 Get의 요청을 받을수 있는 API.
(3) Test 클래스
WAS를 실행 하지 않고, 테스트 코드로 검증하기 위함.
package com.jojoldu.book.springboot.web;

import org.junit.Test;
import org.junit.runner.RunWith;
import org.springframework.beans.factory.annotation.Autowired;
import org.springframework.boot.test.autoconfigure.web.servlet.WebMvcTest;
import org.springframework.test.context.junit4.SpringRunner;
import org.springframework.test.web.servlet.MockMvc;

import static org.springframework.test.web.servlet.request.MockMvcRequestBuilders.get;
import static org.springframework.test.web.servlet.result.MockMvcResultMatchers.content;
import static org.springframework.test.web.servlet.result.MockMvcResultMatchers.status;


@RunWith(SpringRunner.class)
@WebMvcTest
public class HelloControllerTest {

    @Autowired
    private MockMvc mvc;

    @Test
    public void hello가_리턴된다() throws Exception{
        String hello = "hello";

        mvc.perform(get("/hello"))
                .andExpect(status().isOk())
                .andExpect(content().string(hello));
    }

}
- @RunWith(SpringRunner.class)
테스트를 진행할 때, 내장된 실행자 외에 다른 실행자를 실행.
여기서는 SpringRunner라는 스프링 실행자를 사용.
스프링 부트 테스트와 JUnit사이에 연결자 역할을 함.
- @WebMvcTest
Web(Spring mc)에 집중할 수 있는 어노테이션
선언시, @Controller, @ControllerAdvice사용.
- @Autowired
스프링이 관리하는 빈을 주입.
- private MockMvc mvc
웹 API를 테스트 할떄 사용.
스프링 MVC테스트의 시작점.
이 클래스를 통해, GET, POST등에 대한 API테스트 가능.
- mvc.perform(get("hello"))
MockMvc를 통해 /hello로 주소로 Get을 요청.
체이닝 지원되어 위 처럼 여러 검증 기능을 이어 선언.
- .andExpect(status().isOk())
mvc.perform의 결과 검증.
HTTP Header의 status 검증. (200, 404, 500 등)
여기선 OK즉, 200인지 아닌지.
- .andExpect(content().string(hello))
응답 본문의 내용 검증.
Controller에서 "hello"를 리턴하기 때문에 이 값이 맞는지 검증.
2.3 롬복 소개 및 설치하기
자바 개발자들의 필수 라이브러리.
롬복 : Getter, Setter, 기본생성자, toString등을 어노테이션으로 자동 생성.
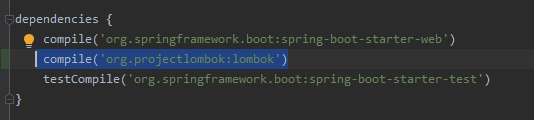
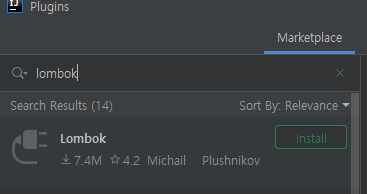
#설치
[1] gradle에 의존성 추가
[2] plugins > Marketplace > lombok검색 > Lombok Plugin 설치
[3] 재시작 > Enable annotation processing 체크.
2.4 Hello Controller 코드를 롬복으로 전환
#대규모 코드를 롬복으로 전환하기 쉬울까?
-> 테스트코드가 제대로 되있다면 쉽게 변경
(1) DTO
package com.jojoldu.book.springboot.web.dto;


import lombok.Getter;
import lombok.RequiredArgsConstructor;

@Getter
@RequiredArgsConstructor
public class HelloResponseDto {
    private final String name;
    private final int amount;
}
- @Getter
선언된 모든 필드의 get메소드를 생성
- @RequiredArgsConstructor
선언된 모든 final 필드가 포함된 생성자를 생성 해 줌.
final이 없는 필드는 생성자에 포함되지 않음.
(2) DTO Tests
package com.jojoldu.book.springboot.web.dto;

import org.junit.Test;
import static org.assertj.core.api.Assertions.assertThat;

public class HelloResponseDtoTest {
    @Test
    public void 롬복_기능_테스트(){
        //given
        String name = "test";
        int amount = 1000;

        //when
        HelloResponseDto dto = new HelloResponseDto(name, amount);

        //then
        assertThat(dto.getName()).isEqualTo(name);
        assertThat(dto.getAmount()).isEqualTo(amount);

    }
}
- assertThat
asswertj라는 테스트 검증 라이브러리의 검증 메소드.
검증하고 싶은 대상을 메소드 인자로 받음.
메소드 체이닝이 지원되어 isEquallTo와 같은 메소드를 이어서 사용 가능.
- isEqualTo
assertj의 동등 비교 메소드
#왜 JUnit이 아닌 assertj의 asswerThat을 썼을까?
- CoreMathcers와 같은 라이브러리 필요없음
- 자동완성 좀더 확실히 지원.
(3) Controller
package com.jojoldu.book.springboot.web;


import com.jojoldu.book.springboot.web.dto.HelloResponseDto;
import org.springframework.web.bind.annotation.GetMapping;
import org.springframework.web.bind.annotation.RequestParam;
import org.springframework.web.bind.annotation.RestController;

@RestController
public class HelloController {

    @GetMapping("/hello")
    public String hello(){
        return "hello";
    }

    @GetMapping("/hello/dto")
    public HelloResponseDto helloDto(@RequestParam("name") String name, @RequestParam("amount") int amount){
        return new HelloResponseDto(name,amount);
    }

}
- @RequestParam
외부에서 API로 넘긴 파라미터를 가져오는 어노테이션
name (@RequestParam("name"))이란 이름으로 넘긴 파라미터를 메소드 파라미터 name(String name)에 저장.
(4) ControllTest
package com.jojoldu.book.springboot.web;

import org.junit.Test;
import org.junit.runner.RunWith;
import org.springframework.beans.factory.annotation.Autowired;
import org.springframework.boot.test.autoconfigure.web.servlet.WebMvcTest;
import org.springframework.test.context.junit4.SpringRunner;
import org.springframework.test.web.servlet.MockMvc;

import static org.springframework.test.web.servlet.result.MockMvcResultMatchers.jsonPath;
import static org.springframework.test.web.servlet.request.MockMvcRequestBuilders.get;
import static org.springframework.test.web.servlet.result.MockMvcResultMatchers.content;
import static org.springframework.test.web.servlet.result.MockMvcResultMatchers.status;
import static org.hamcrest.Matchers.is;

@RunWith(SpringRunner.class)
@WebMvcTest
public class HelloControllerTest {

    @Autowired
    private MockMvc mvc;

    @Test
    public void hello_will_be_return() throws Exception{
        String hello = "hello";

        mvc.perform(get("/hello"))
                .andExpect(status().isOk())
                .andExpect(content().string(hello));
    }


    @Test
    public void helloDto가_리턴() throws Exception{
        String name = "hello";
        int amount = 1000;

        mvc.perform(get("hello/dto")
            .param("name", name)
            .param("amount", String.valueOf(amount)))
                .andExpect(status().isOk())
                .andExpect(jsonPath("$.name", is(name)))
                .andExpect(jsonPath("$.amount", is(amount)));
    }

}
- .param
API테스트 할떄 사용될 요청 파라미터를 설정.
값은 String만 허용.
- jsonPath()
Json 응답값을 필드별로 검증할 수 있는 메소드.
'$'를 기준으로 필드명 명시.
'서적 공부 > 스프링부트 - [스프링부트와 AWS로 혼자 구현하는 웹서비스]' 카테고리의 다른 글
| 스프링 부트 - (6) AWS 서버 환경을 만들어 보자 (0) | 2020.04.07 |
|---|---|
| 스프링 부트 - (5) 스프링 시큐리티와 OAuth 2.0으로 로그인 기능 구현하기 (0) | 2020.03.24 |
| 스프링 부트 - (4) 머스테치로 화면 구성하기 (0) | 2020.03.23 |
| 스프링 부트 - (3) 스프링부트에서 JPA로 데이터베이스 다뤄보자 (0) | 2020.03.13 |
| 스프링 부트 - (1) 인텔리제이로 스프링부트 시작하기 (0) | 2020.03.11 |


